Bag of Dice Holding

How to sew a fabric dice bag for use in tabletop games

Winged Cat Dice Bag

How to Make Dice Bags for Your Hoard of Dice

I have a confession to make. I collect dice. Lots of them. They are pretty and sparkly and feel so good in your hand. I am a dice addict.

I have so many dice that they do not all fit in my dice bag. Well, I guess that means I have to make more dice bags!

I made my first dice bag over 30 years ago. The pattern I use has changed over time, but I finally settled on this one as the best. It holds just the right amount of dice. Plenty of dice to play with while gaming without holding so many dice that others want to borrow them. (Yes, I am that sneaky when it comes to my precious.)

Today, I’m making a new dice bag for my son Carl the Cleric. When Carl played 3.5e when he was a youngling, he had a winged cat familiar named Catlixy. This bag is in memory of that dear Tressym. The perfect fabric was sitting in my big bin of someday fabrics!

Materials
  • 1/3 yd of main fabric
  • 1/3 yd of lining fabric
  • 1 1/2 yd of ribbon
  • Sewing thread and notions
two fabrics, one black and one patterned with gold winged lions on a black background

Directions

1. Print out the pattern pieces in this pdf. You will be making two little bags and then sewing them together and adding a ribbon drawstring. Cut out the two pattern pieces from the paper. Use 1/2″ seams throughout.

2. Cut out two copies of the dice bag side out of main fabric and two copies out of lining fabric. Cut out one copy of the round bottom out of the main fabric and one of the lining. Iron the pieces.

Pattern for Dice Bag placed on fabric
3. If one the main fabric or lining material is easily frayed as this winged cat fabric is, zigzag the edge or use fray check on the side edges. This is to prevent it from fraying near the ribbon opening when the ribbon rubs on it. This metallic fabric was so frayable I both zigzagged it and fray checked it. Wait for the fray check to COMPLETELY dry.
Adding fray check to the edge of the fabric of bag
4. Sew the main fabric, right sides together, along the two sides. Leave small openings which will be used later for the ribbon drawstring. Do not forget to leave these openings or you will have to use your seam ripper to open it up later. I mark the openings with double pins so I know where to stop sewing.

5. Sew the lining fabric, right sides together, along its side, leaving a gap on one side for turning the bag later.

Side seams of dice bag being sewn with a sewing machine
6. Take your time on this next step. Sew the side pieces of the main fabric to the bottom of the bag. Make sure you arrange it so the gaps on the main fabric sides are near the TOP of the bag. If you goof up on this step, you will have to use your seam ripper to take out the stitching so you can redo it. Sew slowly so you can avoid puckers.

7. Repeat for the lining. Make sure you arrange it so the gap on the side is near the bottom of the bag so it won’t be visible. If you goof up this one, it is not critical. Puckers don’t matter for the lining. (The dice won’t tell.)

Sewing bottom of dice bag with a sewing machine
8. Now for the tricky part. Place the main fabric bag INSIDE the lining bag with the right side of the main bag against the right side of the lining bag. Line up the side seams with each other. Pin and sew all the way along the top of the bag.
Place main bag inside the lining bag
9. Stick your fingers through the gap on the side of the lining bag and pull out the main fabric bag. Turn the lining bag right out.

Sew the gap in the lining bag closed as shown. (I do it on the machine, but you could also do it by hand.)

Pull main bag out through gap in liningBoth dice bags right side outSewing gap in bag lining closed with sewing machine
10. Then tuck the lining bag inside the main bag. Iron flat along the top of the bag.

11. Pin the bag and lining together along the dashed line on the side pattern. Topstitch around the bag. Repeat for the second line. Almost done!

Topstitch for the ribbon on the dice bag
12. Cut two pieces of 22″ ribbon. For each piece, you will be looping it through one hole in the side, around the other side and back out the original hole. This is how you get the ribbon to hold the bag closed.

I sometimes use a handy sewing doodad called a bodkin to insert the ribbon, but it’s really just as easy to use a safety pin like this. You might have to work awhile to get the safety pin out at the end, if it happens to catch on the seam allowance.

Inserting ribbon in the dice bag
13. Tie a knot in the ribbon and trim neatly. Apply fray check to the ends of the ribbon.

Voila! For less than $5, you have a dice bag!

Completed dice bag

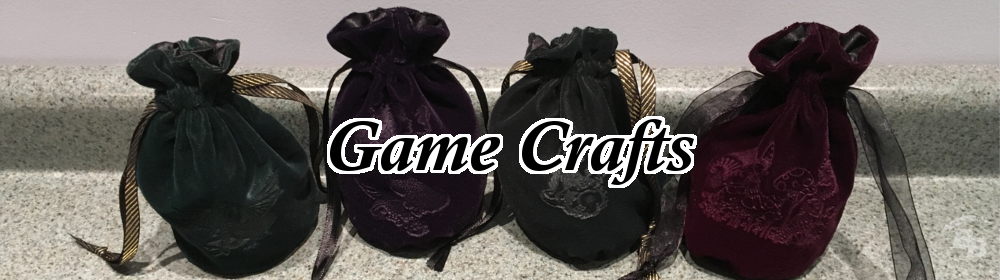
These bags make great gifts. Last Christmas, I made velvet-embossed bags for my 5e players that I filled with red, hard candies. When playing our campaign, I had an elven noble NPC pass them out to the players. “Thank you my heroes! Here take these bags of rubies as a reward for saving the forest!”

fancy velvet embossed dice bags

If you have any questions, ask them in the comment fields below.


Leave a Reply